HOW TO PLACE DETAILS OFF THE MODEL:
( Internet Explorer Glitch Technique):
1. You must be using Internet Explorer. No other browsers work for this.
2. Choose a detail (graphics can’t go off the model) and place it where desired.
3. When you have your detail in place, right click while still holding down the left button.
4. A little box will pop up that says “Settings” and “Adobe Flash Player.” Ignore this box and release both buttons simultaneously (if you have a hard time doing this, release the RIGHT button first, then the left; simultaneously is just quicker).
5. Immediately click anywhere on the garment. Do NOT click anywhere else first or the detail will disappear. Once you click the garment, the detail should stay in place.
6. Keep doing this with more details until your creation is complete. Be careful while placing additional details, because if you accidentally click another detail you’ve already placed off the model, it will disappear.
:) tmck18
1. Use Internet Explorer Glitch Technique as explained above to place details off the model. No other Internet browsers work for this.
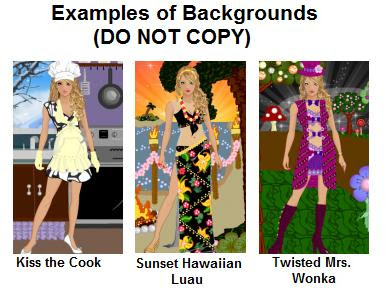
2. Backgrounds are usually made on a separate garment than what you’ll use as your model’s outfit since you’ll be moving your background garment behind the model in most cases.
3. Backgrounds are most easily made on a dress garment because the details are larger, and you get a full body length garment instead of just a top or bottom, so you can get a full background length.
4. Make sure the dress has long sleeves, full length skirt and a tall collar to click on (you can change this later).
5. Start creating your background with details of choice. Here are some suggested details for different things:
• For grass, use the rose detail. You can add blades of grass with the slash detail.
• For horizontal lines, layer multiple stitch details.
• To make solid, flat colors, layer the bead details (starting outside, working in) so only the outer rim color of the beads show. Once you get down to just one or a few beads not covered, layer the slash detail over the “highlighted” portion of the beads that are still showing to finish (the slash detail will be the same color as the outer rim of the bead), or cover them up with a different detail.
• For trees, the tassel detail is great for trunks. Roses, flowers or rip details make great leaves.
• For animals, rose details work great for the bodies.
6. By the way, if you want to work far to the right or left, high past the collar or low past the hem while zoomed in, you’ll first need to place some details in the corners of the zoomed out room so you can get to these places when zoomed in. Do this by using large bow details with the strands. Put four bows on the garment. To place two up high, pick up the bows by the very bottom of the strands, and place them as high and right/left as you can while still seeing them. Do the same for the bottom of the room, but pick up the bow by the top edge instead.
7. Also remember that when you are zoomed in and working far to the right, left, up or down, you still have to be able to see a portion of the garment so you can click on it.
8. Things to remember before saving:
• If you placed details in the corners for zooming purposes, delete them before saving (just click on them and they’ll disappear)
• Go back and change the shape of the dress if it isn’t covered up with details. Do this so that when you move the dress behind the model, you won’t see any parts of the dress. I usually take off the sleeves and collar, and choose a short hem and low bodice.
:) tmck18
In this section, I'll describe how to create different graphic patterns. Before you try them however, here's a tip you may find useful...
Tip for Placing Graphics using the Internet Explorer Glitch Technique:
The Internet Explorer Glitch Technique used for placing details off the garment does not work for placing GRAPHICS off the garment...all parts of graphics that fall outside the garment will always disappear. However, the glitch technique DOES work for easily placing graphics ON the garment where it is otherwise difficult to place them (like on the edges of the garment). Usually to place graphics on the edges of the garment, you'd have to avoid your cursor landing outside the garment when placing the graphic, or the entire graphic would disappear. So you would have to place the graphic somewhere in the middle of the garment, pick the graphic up by the edge and inch it as far out on the edge of the garment as you could without your cursor going outside of the garment. But it's much easier with the Internet Explorer glitch technique, because you don't have to worry about your cursor being off the garment when you place the graphic! Just place it like you would a detail using the I.E. glitch as I described earlier. Try it, it works!
HOW TO CREATE DIAMOND OR ARGYLE PATTERN:
************************************************************************************************
HOW TO CREATE A LOOP PATTERN:
************************************************************************************************
HOW TO CREATE HORIZONTAL STRIPE PATTERN:
************************************************************************************************
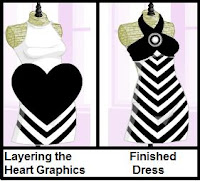
HOW TO CREATE "V" SHAPED DIAGONAL STRIPES PATTERN:
You create this pattern with the flat-colored, solid heart graphic (the one without shine). The bottom of the heart forms the "arrow" lines (or V shape lines).
1. Choose the base color of your garment, and also the color you want your lines to be. Let's say white is your base color and black is your line color.
2. Make the heart graphic as large as you can. Turn it black (line color).
3. Starting at the bottom of the garment, place the lines at the base of the heart where you want the V-diagonal lines to start.
4. Now take another heart graphic and turn it white (base color). Layer it on top and slightly above the black one, overlapping it. Since this second heart is the same color as your garment, it disappears and leaves you with two black diagonal lines forming a "V" shape.
5. Keep layering hearts this way, alternating color, until you finish.
NOTE: Sometimes the garment is wider than the largest heart graphic. In this instance, you'll need to overlap several hearts of the line color off to the upper right and left of your first center heart so that there is a continuous straight edge (just like when you layer beads to get a solid shape and you want it to have a straight edge). Then you'll continue this sequence with your base color, then line color, etc.
Hope that makes sense! :) tmck18
************************************************************************************************


