5/24/12

The Move to Lifetime Games

Hi divas!

In May 23rd's DUC newsletter, Miss Diva DressUp has given us a little more info on DUC's move to Lifetime Games.  In this blog post, I will first go over that newsletter with you and let you know my interpretation of it.  After that, I will tell you how to setup an account at Lifetime Games. Finally, after this blog post I will write another post where you all can list your new usernames on Lifetime. That way, everyone will have an easy place to find their friends' info so you can all re-add each other as friends on Lifetime.

A COPY OF THE MAY 23rd, 2012, NEWSLETTER:

Hello Divas,

We know that many of you are still feeling anxious and frustrated and are looking for answers about DressUp Challenge moving to Lifetime Games. While we cannot answer all of your questions right now (we're still working on the details) we do have some news that we can share with you now.

As you already know, the launch of the new Fashionmaker and Makeover Creator games will be moved to Lifetime Games on servers that are more stable. What does this mean? The most important thing is that there will be less bugs and overall game problems. Unfortunately though, this comes at a price: we won't be able to save any player data when we move to the new servers. This means makeovers, clothing items, friends and points will not be carried over to the new site. However, we're working to open the closets up so that everyone will have access to all of the current DressUp Challenge items.

Everyone will be able to reconnect with friends at Lifetime Games and there is a messaging feature within each game. We encourage everyone to create your account at Lifetime Games (if you haven't already) and start sharing your new usernames with each other now. We're not sure if everyone will be able to use their current DUC username at Lifetime Games as this will depend on existing usernames that are already there.

Some of you have asked if we will be bringing back the Daily Spin Game and the DUC Store: they will not be making a comeback at Lifetime Games.

Many of you have been expressing some confusion as to what this move means for the current DressUp Challenge site. We want to clear up any confusion: the DressUp Challenge site that you are on now will be closed. We will keep a static page up for a period of time after the move to point players to the new site.

Any players who want to save their current makeovers via screenshot should start doing that now. Our own tmck18 has been diligent in offering some helpful advice and reminders about how to do that. She's written instructions on her Fashionmaker Guide Blog..Thanks Tracy!

We mentioned in the April 24 news update that we'll be moving the DressUp Challenge games to Lifetime Games over the next 90 days; this still holds true. We do not have a specific date right now, however, we'll let everyone know in advance when the site will close so no one will have to worry that one day it will just disappear.

We hope that this helps to answer some of your questions and concerns. We know that many of you still have more questions unanswered. As soon as we have those answers I will update the news page again. I hope you will join me too on our Facebook page where I've been waxing nostalgic about DressUp Challenge. We've been through a lot together, and I look forward to making some new memories with each other at Lifetime Games.

xo,

Miss Diva DressUp 
  
So at least we finally have a few answers.  As Miss Diva said, there will be more answers coming as everything gets ironed out, but here's my interpretation of what she has told us about the move to Lifetime Games:


MY THOUGHTS AND INTERPRETATION OF THE MAY 23rd NEWLETTER:
  •  When the move occurs, the current DressUp Challenge site (where it is located on the Internet) will no longer exist.  A static page will be up to re-direct players to the new site on Lifetime Games for a period of time, though.  We will be given notice before it happens.  There is no specific date yet, but it will be within the 90 day time-frame we were given back in the April 24th newsletter. 
  • According to Miss Diva, the move to Lifetime will help alleviate some of the bugs and glitches we currently experience on DUC. However, divas, I must warn you that when any big change occurs, there's always going to be a transitional period where things don't go perfectly.  Be prepared to wade through some glitches for the first while after we move!
  • The new Fashionmaker (FM) and Makeover Creator (MC) games that we were promised two years ago will finally launch when the move occurs, so our current FM and MC will be different than what we have now.  How different? We don't know.
  • The move to Lifetime Games will come with a GIANT price...no user data from the current DUC will move.  This means our usernames, saved makeovers and Fashiomaker items, kudos, points, friend comments and our friends lists will ALL disappear.  We will be starting from scratch, divas.
  • Thankfully, even though we will be starting from scratch and losing all our Fashionmaker-created designs, we will have a lot more "ingredients" to work with than we did when we all signed up on the current DUC.  All currently existing DUC items (clothes, backgrounds, acessories, wigs, etc.), including everything that used to be in the now-discontinued store, will come with our new closets at Lifetime Games.  No dinky little closet like we were given when we first signed up...we will have EVERY DUC item made if everything goes the way the developers want it to.  
  • The discontinued Daily Spin Game and DUC store will NOT be making a comeback when the move occurs.  
  • If you don't have an account on Lifetime Games already, now is the time to do so. Further down in this blog post, I will explain how to do that.  You may or may not be able to keep the current username you have on DUC (someone might already have your username on Lifetime Games), so you'll want to let your friends know whether or not your username is staying the same.  I'll write a blog post where everyone can list their usernames in the comments.
  • If you want to keep your saved makeovers, you can save them to your computer since they will no longer exist on DUC when it moves.  I've written a blog post on how to do that HERE.
  • IMPORTANT NOTE (not in the newsletter):  The game "My Story, My Makeover" on Lifetime Games is NOT the new DUC.  That game was the pre-cursor game to the current DUC...in other words, it existed before DUC did, and seems to be the game that inspired the creation of DUC.  Many of us, including me, played that game before DUC was born.  So don't be afraid...our new DUC should have a lot more than "My Story, My Makeover." 

That's it, divas!  It seems like A LOT of bad news with only a little good, but let's not give up on DUC just yet.  Let's at least give the new DUC a chance.  To do that, you'll need to create an account on Lifetime Games.  So here's how:

HOW TO CREATE AN ACCOUNT ON LIFETIME GAMES:

  1. Go to Lifetime Games HERE
  2. At the top right of the page (near the Search box), click on "Register"
  3. A grey box will pop up titled "Register at myLifetime.com."  Fill out the form and click "Submit."  Hopefully you will be able to get the first username you try; if not, you'll have to fill out the form again until you choose a username that isn't taken yet.  Be sure to write down what your username/password is somewhere if you feel the need.
  4. Once you hit submit, the information in the grey box will change to "Step 2."  You can skip the step if you want since all info in it is optional.
  5. Click "Finish."
  6. The grey box will now say "Registration Successful."  Click the little "x" at the top right of the box to exit out of it.
  7. Now another box will pop up that says "Complete your new game profile!"  Choose an avatar out of the choices provided, and write a little bio in the box provided if you'd like.  Click "Submit."
  8. You're now signed up on Lifetime Games!
  9. You may want to bookmark your profile for quick viewing.

HOW TO ADD FRIENDS ON LIFETIME GAMES: 
  1. Go to Lifetime Games HERE
  2. Click on "Sign In" at the top of the page
  3. Sign in in the grey box
  4. Click on "Games"(on the red bar next to "Video")
  5. On the right side of the page, there is a box under where it says "Logged in as..."  Click on "Friends and Fans" in that box
  6. A new page will appear.  There will be a search box on this page that says "Find Players by Usernames."  Search for your friend by typing in her/his username there.  You'll be taken to their page, and you can click on "Add as Friend."

IMPORTANT NOTE (copied from above):  

The game "My Story, My Makeover" on Lifetime Games is NOT the new DUC.  That game was the pre-cursor game to the current DUC...in other words, it existed before DUC did, and seems to be the game that inspired the creation of DUC.  Many of us, including me, played that game before DUC was born.  So don't be afraid...our new DUC should have a lot more than My Story, My Makeover.

Okay, divas, we've got a lot to do.  Save your makeovers to your computer if you want (maybe even make a scrapbook, copying all the comments from your friends on each makeover, too).  Create a Lifetime account, and start adding all your friends on there.  Below, I've written another post where you can share your Lifetime usernames with everyone.

:) tmck18


Your Lifetime Usernames

If you don't have an account on Lifetime Games already, now is the time to do so.  I've given you the steps on how to do that in the blog post above.  Once you've signed up, you may or may not have the same username as the one you've had on the current DUC.  And since we don't get to keep our friends list when we move, it might get tricky trying to find all our friends to re-add them on Lifetime since usernames may be different.  Thus, here is a post where you can list your current DUC username, and then what your username now is on Lifetime! Just comment under this post and use the following format...

Old DUC Username: ______________  
Username on Lifetime:______________

Thanks, divas!  I hope this helps us keep in touch with all our lovely DUC friends.

:) tmck18

5/7/12

Is this Goodbye to DUC as We Know it?


I’ve gotta say…reading the Newsletter update from May 6th made me SO sad. After the initial update in April about DUC moving to Lifetime Games, I was hoping that the next update would tell us what we can be assured to KEEP when the move to Lifetime occurs…but instead, I feel like Miss Diva was saying goodbye to us and to DUC as we know it. Until this point, I felt like we had some hope, but now my hope is dimming, and my denial stage is crumbling. I finally cried, and my heart is breaking. Without DUC as we know it, a huge whole would burn into my heart. I would miss so much.

First of all, I haven’t really been able to design this past year because I’ve been flat on my back with a bulging disc and bone spurs, making designing difficult (and hence me only occasionally entering challenges, and all with recycled makeovers). It was getting better, and I was starting to think I could begin designing again soon, but my bulging disc herniated in March, and I’m back to square one. Do you know how sad I am that I might never be able to design anything intricate again on the FM, especially any new Disney makeovers? It kills me that I might not have a chance to design again before DUC is gone. ::sigh:: Divas, if you can, please design your hearts out until DUC moves? We might not have the ability afterward.

So if DUC truly isn’t DUC anymore when it moves, I won’t just miss the FM. It goes without saying that I will miss all my beautiful, wonderful divas, and seeing your AMAZING designs and talent! I’m blown away every time I visit one of your pages (which is something I haven’t been able to do much either this year because of my situation). I’m so grateful for Camelot (thank you, Marion!) and Facebook, as we will be able to keep in touch. But I have to admit, I will miss seeing all the new, amazing makeovers you ladies would create. (Now I’m crying all over again…)

Last, but not least (and now I’m bawling trying to type this), I would SO miss how much I was able to make a difference for you divas here on DUC with my Fashionmaker Guide Blog. Because of my health problems (not just my back, but Crohn’s and my other health issues), my life is pretty small. I have yet to be able to have children, my writing/editing career has been stalled, and I haven’t been able to attend church for a year (can’t sit that long), nor take part in any volunteer work.There hasn’t been much I can do to make any kind of difference in this world. My limit for sitting or standing currently is about 5 minutes. It is so frustrating not being able to move your body, shower on your own, or even sit through a meal. Living my life flat on my back this past year has been so monotonous, unfulfilling, and completely frustrating, not to mention painful. I’ve felt like such a burden, a leech, and that I don’t give much back to the world. So with that all in mind…can you imagine how much being able to help you all, just a little, through this teeny-tiny blog, has meant to me? It’s meant EVERYTHING. (Tears streaming down my face…)

And with that said, I want to thank anyone who has ever stopped by this blog and left a comment, letting me know how much I’ve helped you, or asking more questions so I can continue to help. It’s made me feel less of a leech on this world, and I thank you so much for that. Many of you have told me how “selfless” I’ve been by providing the blog and continuing to manage it, but really, it has been so rewarding for me, not selfless at all. If the FM no longer exists after the move, my heart will be broken, because I won’t have this small way of giving back. So again…thank you, divas. My heart will always be grateful to you and grateful to God for the years I had on DUC.

::HUGS::
Tracy

2/24/11

Blog Intro

Welcome to my Fashionmaker Guide Blog!

Many members of DressUp Challenge wonder how to create the amazing clothes, backgrounds, hair, pets and accessories that more experienced members create in the fashionmaker. Or sometimes they wonder how to manipulate features of the Makeover Creator or DUC items to work best for them. Well, I'm here to help! 

All the information is right here at your fingertips. Each tip has it's individual blog post, and I try to keep them in a logical order.  Posts pertaining to the Fashionmaker are near the top, and all other tips and posts (pertaining to general DUC tips, makeover creator tips, or miscellaneous posts) are generally near the bottom. They are clearly titled so you'll be able to find what you are looking for.  If you'd like,  you can search for specific topics by using the search box or the label bubble on the right of the page.

In order to keep the guide organized as I continually update the blog, all blog posts will be dated as if they were all written or updated on the same date.  If I publish them with their correct dates, I cannot organize the posts in whatever order I want them to be (all new posts publish to the very top or bottom of the blog unless I do it this way).  But don't worry, you'll still be able to know what's new on the blog.  Just click on the link "Blog News and Updates" at the top of the page for the dish on what's new! 

Please feel free to make comments (I love them!), and post any questions or suggestions you may have.  There's a comment link at the top of the page called "Comments? Post Here!" and there's an option to comment under each individual post as well.

Happy designing!
:) tmck18

Zooming Tips in Fashionmaker

WORKING FAR OUTSIDE THE GARMENT WHEN ZOOMED IN IN THE FASHIONMAKER:
If you want to work far to the right or left, high past the collar or low past the hem of a garment while zoomed in, you’ll first need to place some details in the corners of the zoomed out Fashionmaker "room" so you can get to these places when zoomed in. Do this by using large bow details with the strands. Put four bows on the garment. To place two up high, pick up the bows by the very bottom of the strands, and place them as high and right/left as you can while still seeing them. Do the same for the bottom of the room, but pick up the bow by the top edge instead.
HOW TO ZOOM IN FURTHER THAN THE "ZOOM IN" BUTTON ALLOWS:

NOTE: This is very useful when you are working with small details as you can see them better for proper placement.

ZOOM IN (two ways): 
* While holding down the "Ctrl" button, click the "+" button. The more you click the "+" button, the larger your screen shot will become.
OR...
* If you have a mouse with a wheel that allows you to scroll up and down, hold down the "Ctrl" button while you move the wheel forward (away from you). The more you move the wheel forward, the larger your screen shot will become.

ZOOM OUT:

* Use the same techniques as before, but use the "-" button instead of the "+," or scroll the wheel backward (toward you) instead of forward.

* If you want to quickly get back to a "regular-sized" screen, just hold down "Ctrl" and click "0." (That's zero, not the letter O).
:) tmck18

Placing Details off the Model (IE Glitch)

HOW TO PLACE DETAILS OFF THE MODEL:
( Internet Explorer Glitch Technique):

1. You must be using Internet Explorer. No other browsers work for this.
2. Choose a detail (graphics can’t go off the model) and place it where desired.
3. When you have your detail in place, right click while still holding down the left button.
4. A little box will pop up that says “Settings” and “Adobe Flash Player.” Ignore this box and release both buttons simultaneously (if you have a hard time doing this, release the RIGHT button first, then the left; simultaneously is just quicker).
5. Immediately click anywhere on the garment. Do NOT click anywhere else first or the detail will disappear. Once you click the garment, the detail should stay in place.
6. Keep doing this with more details until your creation is complete. Be careful while placing additional details, because if you accidentally click another detail you’ve already placed off the model, it will disappear.
:) tmck18
 

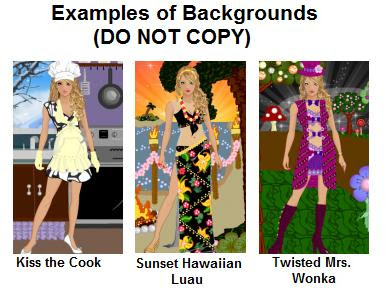
Creating Backgrounds


1. Use Internet Explorer Glitch Technique as explained above to place details off the model.  No other Internet browsers work for this.
2. Backgrounds are usually made on a separate garment than what you’ll use as your model’s outfit since you’ll be moving your background garment behind the model in most cases.
3. Backgrounds are most easily made on a dress garment because the details are larger, and you get a full body length garment instead of just a top or bottom, so you can get a full background length.
4. Make sure the dress has long sleeves, full length skirt and a tall collar to click on (you can change this later).
5. Start creating your background with details of choice. Here are some suggested details for different things:
• For grass, use the rose detail. You can add blades of grass with the slash detail.
• For horizontal lines, layer multiple stitch details.
• To make solid, flat colors, layer the bead details (starting outside, working in) so only the outer rim color of the beads show. Once you get down to just one or a few beads not covered, layer the slash detail over the “highlighted” portion of the beads that are still showing to finish (the slash detail will be the same color as the outer rim of the bead), or cover them up with a different detail.
• For trees, the tassel detail is great for trunks. Roses, flowers or rip details make great leaves.
• For animals, rose details work great for the bodies.
6. By the way, if you want to work far to the right or left, high past the collar or low past the hem while zoomed in, you’ll first need to place some details in the corners of the zoomed out room so you can get to these places when zoomed in. Do this by using large bow details with the strands. Put four bows on the garment. To place two up high, pick up the bows by the very bottom of the strands, and place them as high and right/left as you can while still seeing them. Do the same for the bottom of the room, but pick up the bow by the top edge instead.
7. Also remember that when you are zoomed in and working far to the right, left, up or down, you still have to be able to see a portion of the garment so you can click on it.
8. Things to remember before saving:
• If you placed details in the corners for zooming purposes, delete them before saving (just click on them and they’ll disappear)
• Go back and change the shape of the dress if it isn’t covered up with details. Do this so that when you move the dress behind the model, you won’t see any parts of the dress. I usually take off the sleeves and collar, and choose a short hem and low bodice.
:) tmck18
 

Creating a Stencil Outline of the Background "Window"

The viewing window or “room” of the Fashionmaker is not the same size as a finished makeover.  So how do you know how far out to place details for backgrounds or props?  You make a stencil outline of a finished makeover's background, and use it to guide you in the FM! Here’s how:

  1. Do a makeover with a model wearing a dress of the same shape that you usually use when creating backgrounds. (It's important to use a Fashionmaker dress so you can line up your stencil perfectly later.) 
  2. Save the makeover and then view it in full view. 
  3. Minimize your screen to 90% (a finished makeover is 110% of the size of the “dress” view in the Fashionmaker, so that’s why you need to minimize to 90%). See below for details on how.
  4. Trace the outline of the model’s full body, dress, and then all four outer edges of the makeover's background. (You trace the model’s full body so you will know how far the head goes up and arms/hands go down in relation to the background.)
  5. Now you have a stencil to use in the FM of the correct background “window” size and model! 
IF THIS DOESN'T RESULT IN AN ACCURATE BACKGROUND STENCIL...

One reader told me that the above percentages did not work for her computer and thus the background stencil was not accurate. If this is the case for you, you'll need to work out the correct percentages for your computer. So here's how to do that and create the stencil:


1. Create a fashionmaker dress that you typically use for making backgrounds and save it.
2. Do a makeover with the dress and save it.
3. View the makeover in full-size and trace the model and dress as a stencil.
4. Go back into the fashionmaker and choose the same dress.
5. Now using your stencil, enlarge the screen until the dress in the fashionmaker matches the size of the one in your stencil. You'll do a lot of adjusting here until you perfectly match the sizes.
6. Now make note of the percentage you enlarged the screen to. It will be somewhere over 100 %.
7. Reset your screen to 100%. Now go back into the makeover you created previously with the fashionmaker dress.
8. Remember the percentage you made note of in the fashionmaker? Say it was 110% for example. Subtract 100 from that number, and you're left with the number 10.
9. Now that you are in the makeover, I want you to take that resulting number (10 in this case), and subtract that number from 100. In my example, you'd be left with 90. So 90% is what you would re-size the screen to in the makeover. Now the makeover is the perfect size for the dress and "room" in the fashionmaker!
10. Discard your previous stencil, and make a new one in this size. Trace the body, dress and outline of the background, and now you have your background stencil!
11. Somewhere on your stencil, make note of the percentages you calculated so if your stencil ever gets ripped or smudged, you can make a new one without having to calculate everything again. It's a good idea to write it down someplace else too in case you lose the stencil.
    HOW TO MINIMIZE YOUR SCREEN TO 90% IN INTERNET EXPLORER:

    1. Locate the zooming area on the bottom right of the browser (has the zoom icon, percentage and black arrow).  Here’s a pic: 
    2. Click on the little black arrow.
    3. A little box will pop up. Click on “Custom” at the bottom of it.
    4. Another box will pop up that looks like this: 
    5.  
    6. Delete “100” and type in “90” in the white area. Then click “OK.”
    7. Now you’re zoomed in! When you want to return your screen to 100%, just repeat the above steps and replace “90” with “100.” Alternatively, you can click “Control” + “0” to get back to 100%.
    :) tmck18

    Creating a Stencil of the Model's Head

    HOW TO MAKE A STENCIL OF THE MODEL'S HEAD (for use in making hair/hats/earrings/etc.):
    1. First, make a shirt in the FM with a high collar and save it to your closet.
    2. Go to the Makeover Creator and put on the shirt you made for stenciling.
    3. Choose hair for the model that is close to the head.
    4. Hit the “Zoom in” button on the top left (the head will now be the perfect size for the mannequin in the Fashion Maker when you’re zoomed in there).
    5. Now you’ll want some tracing paper or a clear plastic sheet. Put the paper/sheet up to the screen and hold it there or tape it up. (I tape it up with electrical tape, but that’s my choice. If you’re a child or using someone else’s computer, you’ll want permission before using tape on the computer).
    6. Lightly trace the head, neck, hair, ears, collar and shoulders. If you think you’ll be making masks, glasses, makeup, etc, you’ll also want to trace the facial features.
    7. You may want to make several stencils with different hairstyles that you commonly use if you want to make hair accessories or hats. That way they’ll sit perfectly on the hair you’re making them for.
    8. Now you have your stencil! When you use your stencil to create accessories on the head, just use the same collar in the FM as you made for stenciling so you can line your stencil up perfectly. You can always change the shape of the collar or get rid of it before saving your new creation.
    NOTE: Remember that when you are zoomed in in the fashionmaker, you cannot go far up or down, right or left without having already placed four details in the corners of the fashionmaker "room" when zoomed out.  So you will not be able to use your stencil of the head in the FM until you do this.  For details on how, see tip here.
    :) tmck18

    Creating Different Accessories

    TIPS ON HOW TO CREATE DIFFERENT ACCESSORIES:
    Shoes:
    * Use the pants garment that hugs close to the leg and ankle like tights.
    * Use your detail of choice (I like to use roses or beads) to create the shape of your shoe.  Even if your shoe is form-fitting to the foot, make sure the edges of your shoe still go slightly past the silhouette edges of the feet.
    * If you’re in a rush for time, a quick heel can be made by stacking the belt buckle.
    * You can always create the shoe and leave off the heel, then when you do a MO, add a heel by moving some DUC heels behind feet.


    Toenails:

    * The only garment that shows the feet is the pants. So choose a long pants design, then go down to the feet and place beads where the toenails should be. Then go back and change pants to the form fitting shorts so they can be hidden under most garments.


     Hats and Hair Accessories:

    * I like to sit at a table and put a plastic sheet or paper over my stencil. I then draw a hat that fits the head/hair shape. Then when I make my design, I layer this drawing over my stencil on the computer screen, and simply fill in the drawing with details.
    * If you want to do a simple headband, you can always draw one on your stencil when you make it, so that you can easily create headbands in different colors whenever you need them.

    Jewelry:

    * Earrings can be tricky to position properly, so be very careful when making your stencil to get the ears exactly right. And to keep your earrings even on both ears, use the stitch detail as a ruler to line the earrings up.
    * Necklaces are fun and easy to make, just think it through first. Do you want to make the necklace on a wearable
    garment? If so, you’ll never be able to wear that garment with another necklace, and you’ll never be able to wear the necklace without that garment. Personally, I like to make my jewelry, especially necklaces, on an “undershirt” or “underdress.” Think about such issues before you create your design. I often make a whole set of accessories (hair accessory, earrings, necklace, bracelet and purse) all on one undergarment, and keep it for use in many makeovers.

    Hair:

    * I like to draw my hair over the stencil first just like I do with hats.
    * Hair can be made with many different details. Some I have used are the rose, bead, triple-ring, donut and rip. I often like to combine details. Try different details, layer them in various ways, and see what looks good to you.
    * I usually make hair on a shirt used as an undergarment so I can use the hair with more than one outfit. The only problem with this is that if you make long hair that goes over the shoulders, the garment you put in front of the hair garment will be placed OVER the ends of your hair, so take this into account when designing.

    :) tmck18

    Creating Solid-Colored Items

    HOW TO MAKE SOLID-COLORED ITEMS:

    (For use in making background items, floors, or even making different shapes of dresses, etc.)

    1. Choose the bead detail.
    2. Choose your color and size (the color will end up being the color of the outer rim of the bead, so keep this in mind).
    3. Overlap many bead details (usually working from outside in works best) so that only the outer rims of the beads show. This will give you a solid color.
    4. Do this until you only have a few "highlighted" (inner color of the beads) portions left.
    5. Cover up the highlighted points with other details. If you don't want other details on there, and just a solid color, choose the "slash" detail in the same color as the bead. The slash detail will be the same color as the outer rim of the beads, so you can just layer these slashes over the highlighted portions of the beads to cover them up.
    6. Now you have a solid-colored item!
    DO NOT COPY! 


    Creating Cleavage

    1. Choose a top with a high neckline.
    2. Change it to a flesh tone.
    3. Choose the circle graphic in a medium to dark brown tone (not black, it is too harsh).
    4. Change the size of the circles to the approximate size of the model's cleavage.
    5. Place two circle graphics where the cleavage should be.
    6. Change the color of the circle graphic to the flesh tone.
    7. Overlap the previous brown circle graphics with flesh tone ones in the same size, leaving only the inner edges of the darker circles uncovered.
    8. Now you have your cleavage!
     
    Tips:
    * You may find a tip for placing graphics using the I.E. method useful. Find tip here.
    * Once you've made your cleavage, you cannot change the top of your shirt to a new design because the graphics will disappear (details stay in place, graphics don't)
    * You may want to cover up the neckline of the shirt with a necklace so it isn't obvious.
    * You can make cleavage on every garment if you choose, or you can also make a cleavage shirt and layer it underneath other garments. I use both methods depending on the design.
    :) tmck18
     

    Showing Skin Without Using Flesh-Toned Circle Graphics

    I’ve been using this technique since early 2010 and had sort of described it in my bathing suit post when I  explained how to create a unique bathing suit bottom. However, I realized it should have its own post shortly after I made a very sexy apron a month ago.  So here it is!


    Use This Tip to Create: 
    • A bottom hem that is higher than any of the FM options        
    • A top hem that is lower than any of the FM options (and you don’t want to use flesh-toned circle graphics as skin)
    •   Areas on the bottom or top that are cut out (showing skin), but you don’t want to use flesh-toned circle graphics as skin
    Design Techniques Used in This Tip:
    • You’ll be using the Internet Explorer Glitch Technique for this. See tip here.
    • You’ll be zoomed in and working above and/or below the FM garment style you choose, so remember that you cannot go far up or down, right or left without having already placed four details in the corners of the fashionmaker "room" when zoomed out.  For details on how, see tip here.
    Steps:
    •  If you’re creating a unique bottom (skirt or pant), choose a shirt garment in the FM that bares enough of the mannequin’s pelvis/hip/leg area to create the bottom on.  Conversely, if you’re creating a top, choose the skirt or pant bottom that bares enough torso for the same reason. For example, I used a skirt so I could create the unique top of the apron in the pic above.
    • Place details in the corners of the Fashionmaker room for zooming purposes as outlined above.
    • You may want to create a stencil of your unique garment first on tracing paper or clear plastic sheets.  It makes creating garments like this much easier because you just fill in your stencil with details.
    • Zoom in and start creating your unique garment shape of the top or bottom with details of your choice using the glitch technique.  Roses or overlapped beads (see tip here for overlapping beads) work really well for this, but use whatever details that work for you.
    • Once you’ve saved your design and decided to do a makeover with it, most likely you’ll only be wearing a bottom or top in your makeover and might need to get rid of the model’s white undershirt or gray panties (gray panties stick out beneath bathing suit bottoms you might create).  Here’s how to get rid of them:
      • White undershirt: Put on a top, move the undershirt behind the model, then take the top off and the model’s torso will be bare. If you don’t like how the tops of the sleeves show a bit behind the shoulders, first change the undershirt to a bra, then do the steps.
      • Gray panties:  These cannot be moved behind the model. However, they can be replaced by the pink g-string panties.  Or if you put on a dress and move it backward, the panties come off.  However, now you have a dress hem that may be showing behind the model.
    :) tmck18

    How to Create Swimsuits (2 Methods)

    First Method (easiest):

    1. Choose the shirt garment with the "V" hem that covers the pelvis area.
    2. If you want to create cleavage on the same garment as the suit, read how to do that above. You'll need a high neckline for that. Otherwise, choose a neckline that suits the kind of bathing suit you want to make.
    3. Now you've got the shape of a one piece bathing suit! If you want it to be a bikini, use the circle graphic to create a flesh tone on the stomach.
    Second Method (more difficult, but you can create a unique bottom):

    1. Instead of using the V-hem shirt to cover the pelvis, choose a shirt with a shorter hem that doesn't cover it.
    2. The legs and pelvis area are now exposed so you can create a unique bottom of your own (using the internet explorer glitch described earlier in this blog). I like to use bead layering for this to create a solid color, but use whatever detail you desire.
    3. Cover the hem of the shirt with details so you don't see it.

    :) tmck18

    ************************************************************************************************
     HOW TO BE FREE OF THE EVIL GRAY PANTIES SHOWING UNDER SWIMSUITS:

    (Another tip for the Makeover Creator, not Fashion Maker, but still useful.)

    Get the pink undies from your closet/storage (if you don't have them, they are in the store for points). They have a really high g-string type leg, and they replace the gray panties when you put them on, so they don't peak out from under bathing suits. Now your bathing suit should be free of the evil gray panties. Hooray for freedom!
    :) tmck18

    Creating Different Textures

    Note: You may find a tip about placing graphics using the I.E. method useful. Find tip here.
    SILK:
    1. Make your garment white or another light color.
    2. Choose the circle graphic in a different, darker color, and cover up the white or light color with it. The garment will now shine like silk.


    VELVET:
    1. Make your garment a shade or two lighter than what you want the color to be.
    2. Cover up the garment with multiple circle graphics in the color you want the garment to be. The garment will now look like it's velvet.


    SEQUINS:

    1. Choose your garment and color.
    2. Go to "textures" and click on the right arrow twice.
    3. Choose the third pattern on that row in a color lighter than your garment.
    4. Size the pattern on the smaller side.
    5. Your garment should now look like it has sequins! For an even more believable effect, use the "sparkle" graphic in different sizes and place them on various points of the garment (sparingly).


    ALLIGATOR SKIN:
    1. Choose your garment and color.
    2. In the same color as your garment, choose the flower graphic with four petals.
    3. Overlap several of these graphics, working left to right, so that the middle circle of the flowers don't show.
    4. Keep doing this left to right. When you get to the second row, overlap the bottom petals of the first row with the top petals of the second, and so forth. Your garment should now look like alligator skin!


    SNAKESKIN:

    *Use the alligator skin technique above, but use the shiny heart graphic instead of the flower.


    LACE:
    *There is a lace pattern (click to the left twice, and it's the third from the left on that row), or you can make your own lace by placing several daisy graphics side by side.


    FUR:
    1. Use the rip detail in the same color as your garment.
    2. Start with large rips to get a base, then layer smaller ones over the base.
    3. Make sure you let some of the rip edges go slightly past the garment edges. Your garment should now look like fur!


    KNIT:
    *Either overlap the rose detail or the bow detail (without the strands) side by side for a knitted effect.


    :) tmck18

    Creating Sheer or Transparent Clothing


    How to Create Transparent/Sheer Clothing:

    1.  Choose your garment type: shirt, dress, pants or skirt.
    2.  Make a stencil of the relevant parts of the model's body. For pants and shirt, this is easy.  Just choose a form fitting garment and trace the body.  Dresses and skirts are trickier because they don't show the arms or legs.  So follow these steps:
            DRESSES:
    • To make a stencil of the model's body for a dress, you'll need to go into the Makeover Creator.  Put on a bra and undies, then save the makeover.
    • Go into your makeover.  The large view of a makeover is 110% of the size of the dress view in the Fashionmaker.  So what you'll want to do is minimize your screen to 90% when you're viewing the makeover.  Now the model is the perfect size for the dress in the Fashionmaker!  So trace the body of the model, and now you have your stencil of the body for the mannequin in the Fashionmaker.
             SKIRTS:
    • To make a stencil of the legs for a skirt, you'll just need to use the same stencil you made for the pants, as the pants and skirts views are the same size.
    3.  Now that you have your stencil of the body for your specific garment, choose your specific garment and leave it the color white.  You're going to be "drawing" the skin on top of the garment with a flesh-tone colored circle, so if you use a dark base color, it won't look good.  If you don't want your garment to be white, still choose white.  Then cover the garment in the color you want it to be with that color of circle graphic before "drawing" the skin of the model on top.
    4.  Now that you've chosen your garment color, it is time to use your stencil.  Line up your stencil on the mannequin.  Now, using a flesh-tone circle graphic, "draw" the body of the model that you stencilled on top of the garment where you want the garment to be transparent.
    5.  You can change the shape of the garment's silhouette by choosing a detail of your choice (in my example, I used the flower detail) in the color of your garment, and outlining the edges of your silhouette with it.  You'll see that I did this in my example pic just on the bottom hem, but you can do it to any part of the garment to make it wider or flare out.  I added some details in the middle of it sporadically for fun, but it's not necessary.
    6.  Now you have your transparent garment!

    Creating Graphic Patterns

    In this section, I'll describe how to create different graphic patterns.  Before you try them however, here's a tip you may find useful...
    Tip for Placing Graphics using the Internet Explorer Glitch Technique:
    The Internet Explorer Glitch Technique used for placing details off the garment does not work for placing GRAPHICS off the garment...all parts of graphics that fall outside the garment will always disappear. However, the glitch technique DOES work for easily placing graphics ON the garment where it is otherwise difficult to place them (like on the edges of the garment). Usually to place graphics on the edges of the garment, you'd have to avoid your cursor landing outside the garment when placing the graphic, or the entire graphic would disappear.  So you would have to place the graphic somewhere in the middle of the garment, pick the graphic up by the edge and inch it as far out on the edge of the garment as you could without your cursor going outside of the garment. But it's much easier with the Internet Explorer glitch technique, because you don't have to worry about your cursor being off the garment when you place the graphic! Just place it like you would a detail using the I.E. glitch as I described earlier.  Try it, it works!
     
    HOW TO CREATE DIAMOND OR ARGYLE PATTERN:
     
     
    ************************************************************************************************
    HOW TO CREATE A LOOP PATTERN: 
    ************************************************************************************************
    HOW TO CREATE HORIZONTAL STRIPE PATTERN:
     
     
    ************************************************************************************************
    HOW TO CREATE "V" SHAPED DIAGONAL STRIPES PATTERN:


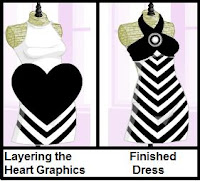
    You create this pattern with the flat-colored, solid heart graphic (the one without shine). The bottom of the heart forms the "arrow" lines (or V shape lines).

    1. Choose the base color of your garment, and also the color you want your lines to be. Let's say white is your base color and black is your line color.

    2. Make the heart graphic as large as you can. Turn it black (line color).

    3. Starting at the bottom of the garment, place the lines at the base of the heart where you want the V-diagonal lines to start.

    4. Now take another heart graphic and turn it white (base color). Layer it on top and slightly above the black one, overlapping it. Since this second heart is the same color as your garment, it disappears and leaves you with two black diagonal lines forming a "V" shape.

    5. Keep layering hearts this way, alternating color, until you finish.

    NOTE: Sometimes the garment is wider than the largest heart graphic. In this instance, you'll need to overlap several hearts of the line color off to the upper right and left of your first center heart so that there is a continuous straight edge (just like when you layer beads to get a solid shape and you want it to have a straight edge). Then you'll continue this sequence with your base color, then line color, etc.

    Hope that makes sense! :) tmck18
     
    ************************************************************************************************
     

    How to Save Pictures of Makeovers to your Computer

    SAVING MAKEOVERS IN THUMBNAIL SIZE

    *First, create a new folder for your makeovers on your desktop.
    • On your computer desktop, right click your mouse.  A box will pop up.  Click on "New."
    •  Another box will pop up. Click on "Folder."
    • Title your new folder
    Now that you have a folder to save your makeovers in, go to your page on DUC.   You'll see your four most recent makeovers in thumbnail size...these are the size you'll be saving your makeovers in.  Now, you have two options for saving them...

    Option 1:
    1. Minimize your browser window so you can see your desktop (click the first button that looks like a minus sign in the upper right corner of your Internet browser window).
    2.  Move your makeover folder to the right side of your desktop.
    3.  Restore your Internet window (click on it in the task bar at the bottom of your screen)
    4. Now "restore down" your Internet window (click on the middle button in the upper right corner of your window).  This will make your window smaller, and you'll be able to see your desktop with your folder there.
    5.  Now simply click on the makeover you want to save, and drag it into the folder on your desktop!
     *This is the fastest way of saving makeovers, but the only drawback is you don't get to title the pictures of your makeovers during the saving process.  Instead, they will just be numbered.  However, you can rename them by double clicking on the picture to view it, then click on "File" and then "Rename."

    Option 2:
    1. Right click on the makeover you want to save (make sure you're viewing only four makeovers at a time for the correct size).
    2.  A box will pop up.  Click "Save Image As."
    3. A box will open where you can find the folder you created for your makeovers.  Find that folder under "Desktop."
    4.  In the "File Name" line, type in the title of your makeover.
    5.  Click the "Save" button.

    Now you've saved your makeover!

    SAVING MAKEOVERS IN "FULL VIEW" SIZE


    *First, create a folder for your makeovers on your desktop.
    • On your computer desktop, right click your mouse.  A box will pop up.  Click on "New."
    •  Another box will pop up. Click on "Folder."
    • Title your new folder
    Now that you have a folder to save your makeovers in, go to your page on DUC.  Find the makeover you want to save, then click on it so you are viewing it in "full view" (where you can kudo/comment on the makeover).  Now you have two options for saving them...
      Option 1: Taking a Screenshot and Using Paint

      1.  Take a screenshot of the makeover (hold down the Alt key while clicking the Print Screen key on your keyboard)
      2.  Go into the Paint program on your computer (click Start or the little windows icon at the bottom left of your screen on your desktop.  A list of choices will pop up.  Choose "Paint."  If Paint is not there, type it in the Search bar at the bottom of the list to find it.)
      3.  Paste the screenshot into the Paint program (click on "Edit" at the top of the screen and choose "Paste" from the dropdown box, or simply hold down the "Control" key while clicking "V" on your keyboard).
      4.  Use the paint tools to crop the screenshot so only the makeover remains.
      5.  Click on "File" at the top of the screen, then click "Save as" from the dropdown menu.
      6.  A box will open where you can find the folder you created for your makeovers.  Find that folder under "Desktop."
      7.  In the "File Name" line, type in the title of your makeover.
      8.  Click the "Save" button.

      Option 2: Using the Snipping Tool 

      1.  Open the Snipping Tool on your computer (click Start or the little windows icon at the bottom left of your screen on your desktop.  A list of choices will pop up.  Choose "Snipping Tool."  If Snipping Tool is not there, type it in the Search bar at the bottom of the list to find it. It may ask you if you'd like to add it to your taskbar at the bottom of your screen.  Feel free to do that.). A box will pop up that looks like this:


      2. Ignore the box and use the cursor to drag around the outline of the makeover you want to save.  A red outlined box will now be around your makeover. Let go of the mouse button, and the makeover will automatically pop into the Snipping Tool Window as the window expands.
      3.  Now it's time to save your makeover.  Either click on the icon in the toolbar that looks like a floppy disk (if you hover over it, it will say "Save Snip"), or go to "File" and choose "Save As."  A box will open where you can find the folder you created for your makeovers.  Find that folder under "Desktop."
      4.  In the "File Name" line, type in the title of your makeover.
      5.  Under "File Name, there is "Save as Type." Make sure JPEG is the type selected to take up less memory.  If it's not, click on the down arrow at the end of the box, then choose "JPEG file (*JPG)."
      6.  Click the "Save" button.

      Now you've saved your makeover!
      **********************************************************************************

      *NOTE:  If you don't want your Makeover file on your desktop (it takes up more memory on your desktop), you can save it or cut/paste it to your C drive instead.  Just click on the Windows icon at the bottom left of your screen and the startup menu will pop up.  Click on "Computer" then choose "OS: (C)" to save or paste the folder there.  I like mine on the desktop for convenience, but if your computer is running slow, I'd definitely save it to your C drive.

      :) tmck18

      Creating Tights or Nylons

      This comes from my wonderful friend Karen Van Houten. It was posted on the Q & A thread, and I thought it would be a great contribution here, so I've copied and pasted what she said below.  Before you try it, you may find a tip about placing graphics using the I.E. method useful. Find tip here.

      MAKING TIGHTS or NYLONS:

      Let's say you've made a light blue dress and want to make tights or nylons to match. Try one of these two ways:
      1. Solid Color tights: Choose the pants that are skin-tight.(choose the waiste hight you think would go well behind the dress) Simply make the pants the same color as your dress, and if you wish, decorate it with graphics that match well.
      2. Nylons that have a 'hue' of the dress: First start with the same skin-tight pants. Make them the same color as your dress. BUT, then go to graphics and choose the solid colored circle and make it the same color as your model's skin. Take that circle and color over the top of your dress-colored tights. It will have the skin color but will have a 'hue' of the color around the edges like real nylons would have. You can leave it this way or decorate with tiny graphics to make it fancy.
      Your tights/nylons will not have the feet in them, so plan on putting a boot or high-top shoe on.
      Thanks Karen, this is a fabulous tip!!
      :) tmck18

      General DUC Tips and Info

      NOTE:  This section will be updated as people ask basic questions about DUC or give me suggestions for general DUC tips. 


      CREATING LINKS TO MAKEOVERS  

      There are TWO aspects to creating working links of makeovers on DUC.  You have to post it correctly for it to "light up," allowing people to simply click on the link and be taken to your makeover.  Then, you have to make sure that the link is short enough, or a DUC bug will cut off the end of the link, and the link won't take you directly to the makeover.

      GETTING THE LINK TO "LIGHT UP"  

      1.  First, you'll need to copy the URL (web address) of the makeover you want to create a link to.  Click on the makeover so it takes you into "full view" (the view where you can kudo/comment on it). Now you need to copy the URL of that page.  Here's a quick tip on how to copy a URL (for thorough instruction on copying and pasting, click HERE): Take your mouse and go up to the address bar of the browser (the long white or gray box at the top of the screen). Right click on your mouse, and the URL should become highlighted and a drop-down box should appear.  Choose "Copy" from the drop-down box to copy the URL.  


      2.  Now that you've copied the URL of your makeover, you'll need to paste it into the comment box you are posting the link in (right click again and choose "Paste").  Due to a DUC bug though, you'll need to also have a character before and after the URL for it to link properly.  Either put the URL in between parenthesis, or you can write a word before AND after the link with SPACES in between, or on separate lines like this:
                                 (word)
                                 (your link)
                                 (word)
        Does that make sense? Just do a word/phrase before and after the link (WITH spaces or lines in between the words and your link of course) or use parenthesis around the link WITHOUT spaces between.

        SHORTENING YOUR LINK


        URLs must be relatively short or another DUC bug will cut off the end of it, and the link won't work.  If your URL is too long, you'll simply need to shorten it by using the Tiny URL free service HERE or a similar application. Just paste your URL into the box provided and click the button "Make TinyURL." Then copy the smaller version of your URL it gives you and use it to create your link.  If you think you might post the same makeover again in the future, you can put a comment under your makeover with the new tiny link for future use.

        **************************************************************
        VOTING


        * How to Vote for Multiple Entries on One Page
        1. Click on the first entry (but do NOT unclick...keep your finger pressed on the button).
        2. Quickly move to the second entry (with your finger still pressed down on the button).
        3. Now that your cursor is on the second entry, release the button and click again. You've voted for both!
         *How to See an Entry Up Close Before Voting on it
        1. Right click on the TITLE of the makeover.
        2. When the little box pops up, click on "Open in New Window."
        3. The makeover will now open up in a new window in your browser for you to get a closer look. When you're done checking it out, go back to your first window to resume voting.
        **************************************************************